

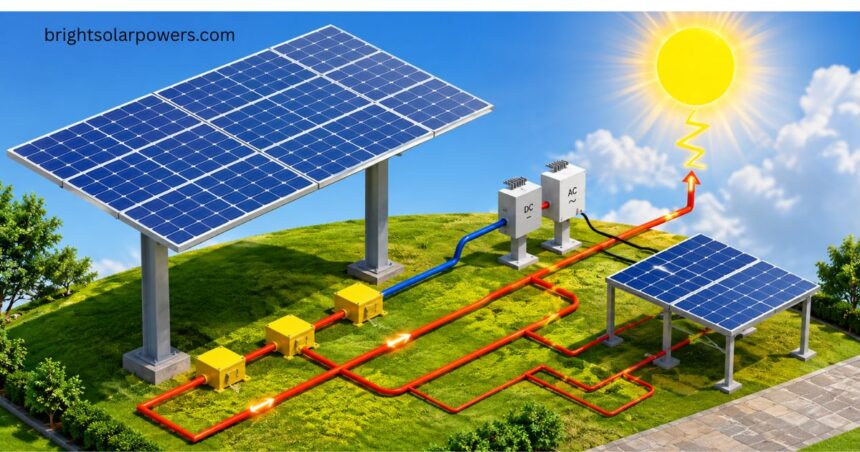
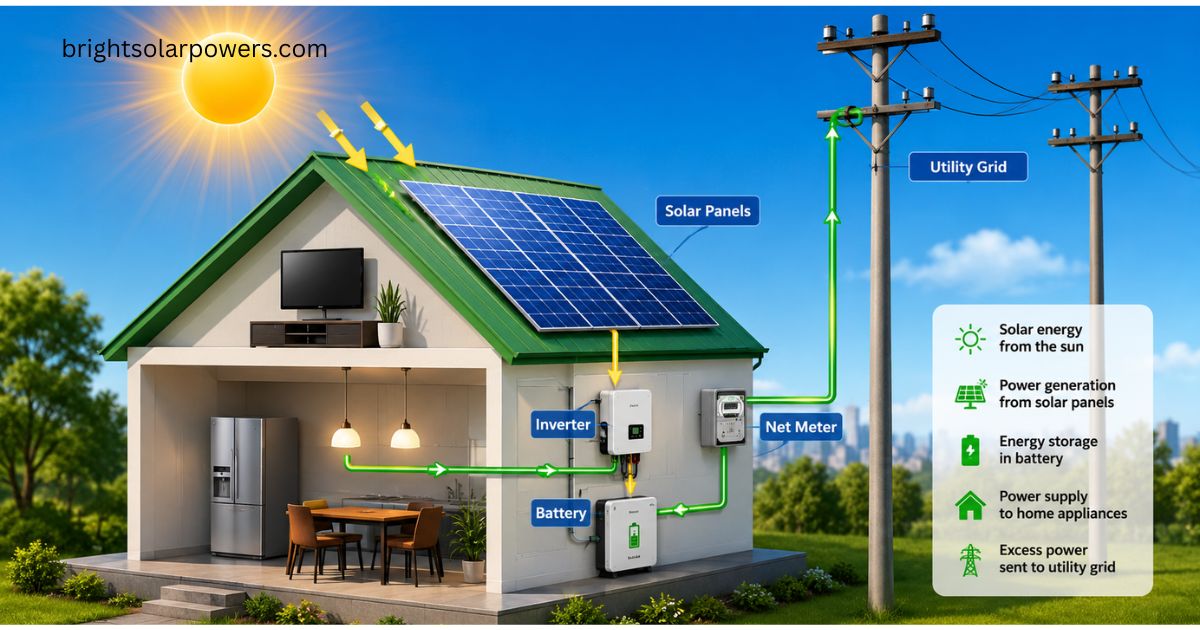
A solar wiring diagram is basically a map of your rooftop solar system. It shows exactly how electricity travels from your panels to your home’s fuse box and, in most Indian setups, on to the DISCOM’s grid through a net meter.
Solar Wiring Diagram
If you’re planning a rooftop solar installation in India, understanding this diagram helps you talk to installers with confidence, check quotations properly, and make sure your system meets CEA (Central Electricity Authority) safety standards before it goes live.
The Five Building Blocks of an Indian Solar System
Every residential solar setup in India is built around five core parts. The PV panels, mounted on the roof, generate DC electricity. The inverter converts that DC power into AC power usable by home appliances.
Wiring and protection devices, including cables, MC4 connectors, isolators, and breakers, carry and safeguard that power along the way.
The distribution or fuse box is where solar power joins your home’s existing wiring. Finally, a bidirectional meter tracks both the units you draw from the DISCOM and the units you export back to the grid.
Skipping proper design at any one of these stages is the most common reason installations underperform.
Wiring Solar Panels in Series vs Parallel
Series wiring connects the positive terminal of one panel to the negative terminal of the next, forming a chain. This raises the total voltage while current stays the same as a single panel.
Most Indian rooftop systems use series strings because it keeps cable current low and matches typical string inverter input ranges.
The downside is that shading on one panel can drag down the whole string’s output, though bypass diodes limit the damage.
Parallel wiring joins all positive terminals together and all negative terminals together. Voltage stays at a single panel’s level while current adds up.
This gives better shade tolerance but needs thicker cable and stronger protection equipment to handle the higher current safely, which is an important cost consideration for larger rooftop arrays.
Most home installations in India actually use a series-parallel combination, especially for systems above 3 to 5 kW, to balance voltage requirements with shading realities across an Indian roof, where water tanks, chimneys, and staircase heads are common shading culprits.
Indian Voltage Standards You Should Know
Unlike the US National Electrical Code, which caps residential DC voltage differently, or European standards, which allow higher voltages, Indian residential supply runs on 230V single-phase for most homes and 415V three-phase for larger homes, commercial premises, and systems above roughly 5 to 10 kW load.
Your installer’s string sizing calculations must respect your inverter’s DC input range while staying compatible with your home’s phase connection.
If your DISCOM has sanctioned only single-phase supply, your solar inverter must also be sized for single-phase output, a detail some vendors gloss over in quotations.
Inverters: The Heart of the System
The inverter takes raw DC power from your panels and converts it into usable AC power. Before choosing one, it’s worth checking the maximum DC input voltage and minimum start voltage the unit can handle, along with its maximum input current.
The number of MPPT, or Maximum Power Point Tracker, channels also matters, since more channels help when your roof has multiple orientations or partial shading.
Just as important is BIS certification: inverters sold in India should carry Bureau of Indian Standards certification, and it’s worth asking installers for this explicitly.
Many modern inverters also offer app-based monitoring, so you can track daily generation in units, or kWh, directly from your phone, which is useful for verifying your DISCOM bill against actual export.
Wiring, Cables, and Protection Devices
Cable and connector ratings must match the job, since undersized wiring increases resistance, wastes generation, and is a fire risk in India’s high-temperature rooftop conditions.
Outdoor runs should use UV-resistant, weatherproof solar cable rather than ordinary household wire, and MC4 connectors remain the industry standard for panel-to-panel and panel-to-inverter connections.
A DC isolator, or disconnect switch, must sit between the panels and inverter for safe shutdown during maintenance, and circuit breakers and fuses on both the DC and AC sides are mandatory under CEA safety norms.
All exposed metal parts, including panel frames and mounting structure, need proper earthing, which is frequently overlooked and is one of the most common causes of installation rejection during DISCOM inspection.
Net Metering and DISCOM Connection in India
This is the step most guides written for the US or UK market skip entirely, and it’s often the most confusing part for Indian homeowners.
Net metering rules are set at the state level by each State Electricity Regulatory Commission, not centrally, so the process and export tariff vary depending on whether you’re connected to a DISCOM like BSES, Tata Power, Adani Electricity, MSEDCL, or your state board.
In general, you apply to your DISCOM for net metering after installation, often through the National Portal if you’re availing the central subsidy.
The DISCOM then conducts a technical feasibility check and inspects the wiring, earthing, and protection devices before a bidirectional meter is installed to record both imported and exported units.
Surplus units of solar wiring diagram you export are either adjusted against your bill under net metering or paid out separately under net billing, depending on your state’s regulation.
Because these rules differ by state, it’s worth checking your specific SERC’s net metering regulations before finalising system size.
PM Surya Ghar Muft Bijli Yojana: Subsidy for Rooftop Solar
Since this is one of the most-searched terms for Indian homeowners looking at rooftop solar, it deserves a section of its own.
Launched by the central government, the scheme provides central financial assistance covering 60% of system cost for 2 kW systems and 40% of additional cost for capacity between 2 kW and 3 kW, with the subsidy capped at 3 kW. At current benchmark pricing, this works out as follows:
| System Size | Approximate Subsidy |
| 1 kW | ₹30,000 |
| 2 kW | ₹60,000 |
| 3 kW or higher | ₹78,000 |
Households can also access collateral-free loans up to ₹2 lakh at concessional interest rates through public sector banks, applied for via the national portal.
The application process starts with registering on the pmsuryaghar.gov.in national portal using your electricity consumer number, followed by getting a feasibility approval from your DISCOM.
Once approved, you choose an MNRE-empanelled vendor to carry out the installation, then apply for net metering and get the bidirectional meter installed. The final step is submitting the installation report on the portal, after which the subsidy is credited directly to your bank account.
What to Check
When your installer shares a wiring diagram for approval, it should show the panel string configuration and cable sizing, the DC isolator’s location and rating, the inverter make, model, and MPPT configuration, and the AC-side breaker and isolator positioned before the distribution board.
It should also mark the earthing points for both the panel structure and inverter body, along with the bidirectional meter position, matching your DISCOM’s approved single-line diagram format.
Most DISCOMs require this single-line diagram as part of the net metering application, so getting it right the first time avoids delays in inspection and subsidy disbursal.
Common Mistakes to Avoid
The most frequent and costly mistake is undersizing cables to save money, which increases losses and raises fire risk in India’s hot climate.
Skipping proper earthing is another leading cause of DISCOM inspection rejection, while ignoring shading from water tanks, adjacent buildings, or staircase heads during string planning quietly cuts into daily output.
Choosing solar wiring diagram, a vendor who isn’t empanelled with MNRE can disqualify you from the PM Surya Ghar subsidy entirely, and failing to confirm BIS certification on inverters and panels leaves you without a safety guarantee that Indian regulations are designed to provide.
FAQS about solar wiring diagram
How to do solar wiring?
Connect solar panels in series or parallel to a charge controller, then link to the battery and inverter. Use proper MC4 connectors, correctly sized cables, and a fuse for safe power flow.
How does solar wiring work?
Sunlight hits the solar panel, generating DC electricity that flows to the charge controller and battery. The inverter then converts this DC power into AC electricity for home use.
How much subsidy can I get for rooftop solar in India?
Up to ₹30,000 for 1 kW, ₹60,000 for 2 kW, and ₹78,000 for 3 kW or higher systems under PM Surya Ghar Muft Bijli Yojana.
How to draw a solar wiring diagram?
Place the solar panel symbol and connect it to the charge controller, battery, and inverter in order. Label the wire gauge, polarity, and safety components so the circuit stays easy to follow.